Monday, December 28, 2015

A Year In Review

Hail All!  Here we are at the end of another year.  Everyone in my house managed to squeak by without any major hiccups.  Which is always cause to celebrate.  This is a time to reflect upon our failures, and plan for next years improvements.  A time when we can look back at those times we were embarrassed by doing something silly (translation stupid), and, if you are me, at those times when we should have been embarrassed and weren't (that's what happens from having no shame).  So I thought I would take a moment to reflect on last year. 

This was our first entire year as Louisiana residents.  All this year I have looked at every murky swampy looking pond, and only once saw an alligator in the wild.  I'm still not sure about that one either since we were doing 80 on the interstate.  The first assumption that everyone has about Louisiana is that it is fraught with gators (the second is that its full of swamp people and its not).  I expect to be more impressed in the next year.  Is it to much for a girl to ask to see an alligator in the wild from a safe distance?

This year we transitioned from being a homeschool family back into regular school.  This decision came after much prayer, and the ladies have been very blessed with both friends and opportunities since then.

This year we moved from our soul sucking rental.  I should say it was soul sucking simply because it was in the most phenomenal neighborhood, but the house was super cramped, and internet wasn't available (which is a must for the tele-commenting Señor Hotness).  That was a pretty long list of first world problems, but after much waiting we were blessed to find a house perfect for our family. 

This year was also a huge year of changes in the job department.  Señor Hotness took a new position with a new company.  He is still a super awesome lighting guy, but where he use to cover an area from East Texas to the Mississippi border now he manages a sales area  that is pretty much all of the central time zone in the US, and two Canadian Provinces.  To say he's gone a lot is an understatement, but we are so happy that he is home every weekend.  Also through the magic of FaceTime he is always here for family prayer, and we are able to see him for face to face conversations every night.  I also learned that you can have entire text conversations solely through DubSmash...and they make perfect sense.

This year I finally admitted to myself that I HATE to paint walls.  Which is pretty weird considering how much I love to paint pretty much everything else.

This year I realized that I need some accountability if I want to lose weight or become more active.  Although, I will say moving into a house with three flights of stairs has improved my activity greatly. My girls too.  They loved all the stairs we have in this house until the first time we had to put up laundry.  Then they just became an unbearable burden.

This year I made many awesome friends in a place that I wasn't sure I would find any, and have been very enriched knowing them.  I discovered that Louisiana isn't full of swamp people, and even though I live 30 minutes away from the Duck Commander head-quarters the closest I have ever gotten to one of the dynasty crew was that time I saw Uncle Si at a four way stop.  Disclaimer: I don't even watch Duck Dynasty.

This year I slacked off on the blog, and even when I did blog it felt stilted and forced.  I felt like I did projects just for the sake of blogging about them, and they suffered for it.  In the next year it is my goal to blog more for me again, and less just for the sake of doing it.  In the beginning this was a place for me to be myself.  A place where I could let my freak flag proudly wave.  A place that I could say what I wished no matter how, lets say quirky, it might have been.  So this next year is going to be all about the basics, and letting me be just as weird as I want to.

I hope that in this New Year you all will be blessed to improve on that which you seek improvement, and as always much laughter and even more love.


post signature

Friday, November 6, 2015

Skirting The Issue: A $4 Sink Skirt Makeover


Hey remember when you were a kid, and sitting on top of cabinet doors was a thing?  What?  You never did that?  Yeah, I never did either.  Its bad enough when the little ones do it, but when your tween takes a spin at door sitting...


Lets just say that I was not pleased with the results, but it gave me an interesting challenge to overcome because...


all of a sudden we were experiencing a door gap.  Out of all the gap-iness one could be experiencing this is by far the most depressing.  Ok not depressing so much a annoying.

Our house is a modest 39 years old, which is a good vintage according to Señor Hotness, and the cabinets were custom built.  They were actually constructed very similarly to how we built our custom cabinets in our old kitchen. However, we have discovered that they didn't secure the joints properly.  They probably held up initially great, but 39 years of wear and tear and they aren't holding up the best.  So a new kitchen is probably in our future (the distance future).  Which means that when something breaks in our current kitchen we are looking for simple easy fixes that don't require a lot effort.  I like to call them duct tape and bubble gum fixes.  As in I fixed this with bubble gum, and that with duct tape.  The true challenge is finding a way to make duct tape and bubble gum fixes still look pretty, and not all janked out.

So since we aren't anywhere near ready to do a full kitchen overhaul right now I was looking at a duct tape and bubble gum fix for sure.  One that would look great, be practical, and be super low on cost.

One option would have been simply moving the hinge slightly, and then screwing it back in and hope that no one else sat on it. 
 

Then you have to worry about the old unsightly holes left behind, and while I'm not opposed to puttying the holes and painting over it, I wasn't wanting to be forced into that decision because of a stupid hinge that got pulled loose because a big kid decided to sit her tush upon it.

So I wasn't really on board with the 'lets just adjust the hinge' camp.  Since this was actually the sink cabinet I thought wouldn't it be cute if I just put a sink skirt on there.  It'll hide the unsightly holes, and look soft and whimsical at the same time.

After that decision was made it was time to absolutely agonize over ever other aspect of the project.


There was also a drawer to consider close to the problem area.  One that I use.  So any curtain rod I got could have a projection no more than 2 inches, or the drawer wouldn't be able to open and close anymore.  I thought about using velcro, but decided that wasn't the look I was wanting to go with.  I must have looked at half a dozen different types of rods.  In the end I went with a super cheapy "sash" rod.  It had a super low profile, and was a very petite rod.  The best of all was the cost.  It was less than $4 for one.  The only downside is its cream and brass color combo was less than desirable, but that is something a little spray paint can fix.

Then there was deciding what to use for the curtain.  I was going to use some drop cloth, and make a faux grain sack look.  I actually really love that look, but have I mention my intense laziness.  I have LONG periods of procrastination interspersed with intense bouts of productiveness.  Unfortunately there was a few weeks of procrastination period to go through before I was willing to do the grain sack curtains.  Then there was also the issue of it needing to be a water friendly curtain since it was going to be a skirt for the sink area.  Then I had a total light bulb moment.  What about a shower curtain?  Those are literally made for a wet area, AND we just so happened to have one we weren't using.  It was a really nice one that was up in the house when we bought it, but I put up mine that I was in love with and this poor thing had been just languishing in my closet.


Did I mention it was also a swanky Pottery Barn shower curtain.


So I measured 1 inch above the seam in the cabinet on both sides.  Then I held the bracket up there, and marked the holes with a pencil.  Then using Señor Hotness's power drill I predrilled the holes for the screws.


As you can see I chose not to fix the brassy issue right now.  Mostly because I really wanted to get it up, and see if I even liked the look.  So many things make sense in your head, but don't always pan out in reality.  That and the humidity was pretty high so I didn't bother.  Its a pretty easy thing to remedy at a later date so I went a head and got it going now instead of dealing with the janky hanging door.


And miracle of miracles...it was level.  Like I knew what I was doing or something.


Before I cut anything I put it on to see if I liked the way it was going to look.  Please forgive the wrinkles.  I don't iron unless under extreme duress.


Then it was time for the drawer test, and we passed with flying colors.  Again it was like I had measured, and researched and thought through the problem!  So I totally scored one for successful problem solving.


My old foe.  As much as I hate ironing I really needed to get all those crazy wrinkles out, and I love the raw edginess of an unhemmed edge as much as the next girl but I wasn't going for that kind of edginess for my curtain.  I am needing this to last a while, and I am always so leary of the true longevity of raw edged curtains.  Then there was also that this was going to be in a high traffic area.  So I decided ironing, and using heat and bond tape would be in order to hem up the raw edge.


As you can see this stuff only runs about $3 at Hobby Lobby.  I've actually had this one for a while, and have used it for several little projects since I'm a non-sewer (is that the right word for someone that doesn't sew?  It seems like that is more descriptive of an area that isn't a sewer). 


Anyway I really like the way this one turned out.  I love the look.  It fun, whimsical, and is a total duct tape and bubble gum fix without looking like one.

This entire project only cost me a little less than $4 for the rod.  I didn't have to worry about how to hang the skirt since I reused a shower curtain which meant it came with its own hanging holes.  The sash rod was the perfect diameter to fit nicely into hanging holes.

So don't let a unsightly problem kill your design.  Use the weakness as an opportunity to add more style to what can be a blah area.  Now get out there, and make something pretty.


Tuesday, October 27, 2015

Scary Honesty

Sometimes honesty can be scary.  Especially if you are like me, and incapable of being serious...ever.  Seriously.  Its a real problem.  You'd think that was a good thing to always be happy, but you see I'm not one of those rainbows and giggles type of girl.  I'm more sarcasm and sass. One of Señor Hotness's most uttered phrases is, "Can you be serious, for just a minute?"  The answer is almost always an emphatic and enthusiastic, no.  So I think it can be frightening for people when they ask if anything is wrong, and instead of joking about it or laughing it off I simply say, yes.

What could possibly be wrong when you have such a rosy outlook on life?


I'm going to get real for a moment, and lay down some truth bombs.  Kids can be huge jerks.  True story.  Parenting is often a crappy job.  Sometimes quite literally.  Sometimes a toddler tantrum coincides with the teen pulling epic amounts of righteous angst.  All while the moody seven year old is choosing to still be moody...about nothing, and I haven't even mentioned Joanie aka Destructo Girl who is often bouncing so quickly between things (translation: fiascos) that its hard to keep track of what she's getting into/destroying presently.  You know the jerkiness is especially high if you've ever said, "I don't negotiate with terrorist"...during church, in response to willful and vigorous pew kicking.  The tween is a pretty stand-up chic right now.  She's choosing to fly under the radar...I'm sure until I least expect it.

Sometimes parenting feels a little like trench warfare.  Especially when going head to head with the most willful five year old on the planet (and feeling like you are losing no less).  I always feel awful for whining, but whining is kind of my thing.  I enjoy the whining...it completes me.  But in all honesty I feel awful to complain when my life does more closely resemble the sunshine and rainbows than the doom and gloom.  I am not doing this alone.  I do have a partner in crime.  Maybe you've heard of him...Señor Hotness, and who doesn't want to a husband that is willing to be called Señor Hotness.  He is also a pretty stand up guy.

At the end of the day, even with the occasional heap of jerktitude floating about, I have five of the coolest dang kids around (don't even try to compare...mine are always going to be cooler than yours).  I feel it an honor to be their mother, and consider myself blessed that I am able to be such a huge part of their lives.  Even if I am often embarrassing to them. (Which is something I go out of my way to do because that is my job as their mother, to be a huge embarrassment, and I aim to excel at life.)  


In the end these people are mine, and I am theirs and I wouldn't change anything about it.  These girlies are my purpose for being, and I'll always pick them any day of the week and twice on Sunday. 

So make sure before you go to sleep to give a jerky kid a squeeze and a kiss, and just remember they aren't always the jerks...sometimes its you.  :)


post signature


Friday, October 23, 2015

GET INSPIRED: CRATE EDITION...6 Incredibly Awesome Crate Upcycles


If you are like me you have all kinds of things just waiting to be made awesome.  I am so very guilty of buying things, and letting them sit for a while until inspiration hits.  The downside of this is I tend to have a few random ugly pieces sitting around because I haven't decided how to finish them out.  One of those things I've just let sit are the crates that I cajoled Señor Hotness into letting me buy a few years back.  I stained a few, but other than a quick sand down they've just been kicking about, looking all, blah.

So after surfing on Pinterest for a minute or two (or an hour or two if I'm keeping it real) I came across these awesomely cool crate upcycles.  I love sharing inspiration when I can so I thought I would share these with the masses.

Check out this simply beautiful crate bookcase that Kelly over at The Lily Pad Cottage pulled off. It's simplicity is all part of its charm.

via The Lily Pad Cottage

Check out this adorable pet bed that Nicole over at Meet the B's put together.  Its brilliance it how understated it is.  Not only would any cat love such a rad bed, but this would also make a fabulous doll bed that any kid would be proud of.  I really hate toys cluttering up the place.  Not to mention that toys generally don't mesh with the overall aesthetic of a space. This could be a great way of marrying those two worlds together.

Via Meet the B's

This bench that Christina over at Operation Home made out of simple crates is pretty impressive.  This brought an awesome pop of color to what could have otherwise been a bland porch.  This look doesn't need to be relegated to the porch alone, it could rock it in any space in the house.

Via Operation Home

This coffee table that Amy over at Her Tool Belt made isn't necessarily a beginner level project, but it is an absolute stunner.  Her post also shows detailed plans if you want to copy the look, and who wouldn't want to copy this gorgeous style.

Via Her Tool Belt

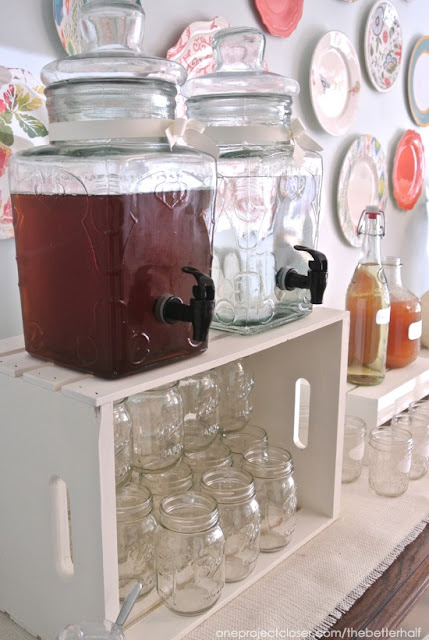
Check out this ingenious drink dispenser idea that Jocie over at One Project Closer used for a fabulous bridal shower.  This was brilliant.  I have a mason jar style dispenser myself, and it didn't come with a lift for easy drink pouring.  So when I saw this awesome idea it really hit home, and it is also perfect place to put the cups for the drinks too.  Great idea.

via One Project Closer

I love how Cat over at The Rustic Willow used these crates to spice up her otherwise ordinary mudroom space.  I'm all beautiful things also being functional, and this project hit the mark perfectly.

via The Rustic Willow

Great ideas abound if we only take the time to look.  NOW GO MAKE SOMETHING PRETTY!


post signature


Monday, September 21, 2015

A $12 Dollar Desk and a Lesson in Photoboming


What's up peeps?  My random thought of the day is how pretty the color pink is...until its in the eye of your 5 year old.  Then its the bane of your existence because she's a kindergartener who still LOVES school, and is super upset that her goopy eyes means she can't go.  So my week has been...trying, because pink eye really stinks.

So years ago we had a farm-style table that was given to us (who doesn't love freebies).  It had extending leaves that were stored in each end of the table.  One of our moves required us to put the table in storage for a few months.  The table didn't fair well in the humid, non-climate controlled storage arrangement that we had.  The table got super warped and janked up so we had to ditch it.  The leaves however were still in super great shape.  The finish was impeccable, and the stain color was pretty much awesomeness.  So I convinced Señor Hotness that they were worth saving because I would do something with them (I left out the word eventually, but it was implied).  Then I proceeded to move them with us 5 stinking times.  Don't judge me.  Sometimes I have a hard time pulling the trigger on a project.


Good things take time, though, am I right?  I promise I'm not a horder.  When we moved to the new house we sold off the bunk beds that we had been rocking for years since this home gave us enough space to ditch the bunks. I think bunks are very functional, and they have their purpose; but they're also super hard to change the sheets, make the bed, and they don't really work well with a nightstand.

So, needless to say we never had nightstands to go in the kids rooms before.  In addition to needing some kind of nightstand solution, we also really wanted a desk in the big girls rooms.  A place where they can do homework, draw in peace, or do any other desk related activities.

Which brings us back to the leftover table leaves, and the fact that they would be the perfect thing to repurpose as a desk/nightstand for the new bedrooms.  


We decided that instead of attaching 4 legs that we were only going to use two legs on the front, and then screw the back into the wall.  Señor Hotness routered out a space along the bottom and back of the leaf to allow a 1 x 4 piece of pine (that we had leftover from another project) to sit right in the groove.  The attached 1 x 4 would be the piece that we attached to the wall.  


Did I mention this was going in the tween's room so she was on deck to help dear ole dad get this desk project done.


She was not the only interested child, Pretty Miss P took time out of her peddling to see what all the fuss was about.


Even Pretty Miss J decided to strike a pose, and the teen photobombed her way into an honorable mention.


Señor Hotness measured the 1 x 4 to fit in the routered area.  A neat trick that Señor Hotness always does is using a speed square as a guide to ensure a nice square even cut.


Apparently, helping looked like so much fun that the teen decided she was the perfect assistant for the tween.


After cutting the board he glued, and clamped it into place. (and the teen photobombed...again)


Then he predrilled holes, and secured the board to the leaf using wood screws. (and another photobomb credit, this time to the tween)  Then, I used minwax dark walnut to stain the pine board to match the existing finish on the leaf.  I knew the board was going to be on the underside of the desk, but leaving it raw would have been just the kind of brain bug that would have made me twitchy...literally.  So I sacrificed the 5 minutes needed to slap some stain on that bad boy, especially as it would keep me twitch free.  Twitch free is the way to be.


The Tween struck her best 'founder father' pose to show off the table legs we had picked out.  I honestly thought that a chunkier leg would have looked better, but since this desk would be shared, we decided to use a skinnier leg so that two stools could fit under it, comfortably.


The legs we bought were already equipped with a screw top, and these are the receiver for the leg.  So Señor Hotness predrilled for the screws that would mount the receiver to the underside of the leaf.


Then he let the tween screw one in, and...


the moody 7 year old got screw in the other.


Then it was time to do the turn over test to make sure we didn't mount the legs wrong, and some how get one on there all janky.  Luckily for us they looked great, and the table was level.  Then it was time to turn our attention to finishing the legs.


The tween and moody 7 year old chose to paint them silver.  Which was lucky because I just so happened to have a can of silver in my spray paint stash.


What does every desk need?  A lamp.  I bought this cool silver barley twist lamp at the Super Goodwill in Tyler Texas for $6, a few years back, and had just not found the right place in our house for it so it had just been kicking about in our garage for a while, probably because it didn't have a shade.  A few weeks ago, I ran into the local thrift store of awesomeness, and there, sitting on a shelf, was a brand new lampshade (with original tags and everything) for $3.  So, yeah, that came home with me.  I think it looks pretty good for a $9 dollar lamp that I did nothing more than put a new light bulb in.


Next time I paint legs I'll need to rig up something to hold them upright while I paint.  As it is I did the old spray and flip on a piece of cardboard, then waited until they were dry enough to touch, and then screwed them onto the table to fully finish drying.


Okay so lets take a minute, shall we, and ignore the cool upcycled desk, and instead look at these gorgeous beds.  Señor Hotness and I found these for a steal at an antique shop in West Monroe.  They are antique mahogany, and they make me so happy to look at.  I'm still trying to research, but so far it appears that the furniture manufacturer that made them went out of business sometime around 1910.  As you can see this room hasn't gotten an updated paint job yet, but these beds can totally rock it out to the boring beige anyway.


Fun Fact: I didn't accessorize the desk top...at all.  All the cuteness was added by the tween and the moody 7 year old, including the Eiffel Tower picture hanging on the wall.


I've been working on a fun design for storage stools to work with the desk, but we haven't had time to get started working on them yet.  Until then they are using a plain old folding chair, and yet it still looks fabulous.


I loved the things that my ladies had set up on their desk so much that I thought I would take a few close ups of all the extreme cuteness.

To give a quick rundown it was $12 (and change) for the legs and mounting accessories, $9 for a rad lamp, and that was all that we needed to transform this simple left over table leaf into custom, cool desk.  It was exactly what we needed to give this room the more sophisticated feel that my elegant young ladies wanted in their "big girl bedroom".

The lesson I learned was don't be afraid to look at what you might have in your own garage to repurpose into something incredibly cool.

Stand by to see the desk we are going to be making for the teen with the remaining table leaf.  We are going to be trying something a little different on it.  Until then...